Isn’t it depressing?
When the winter cold sets in and I know I am not going to get to “play in the mud” for many months, I can get really “down in the dumps.”
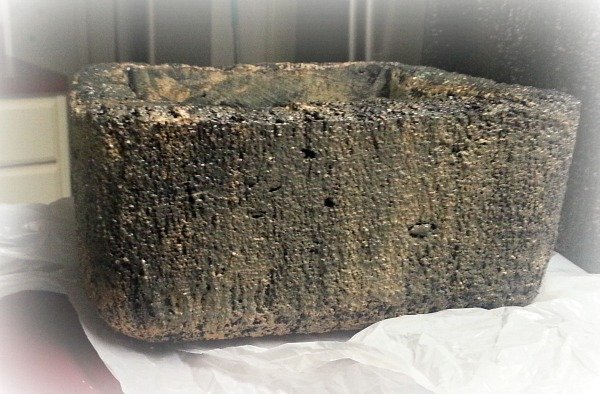
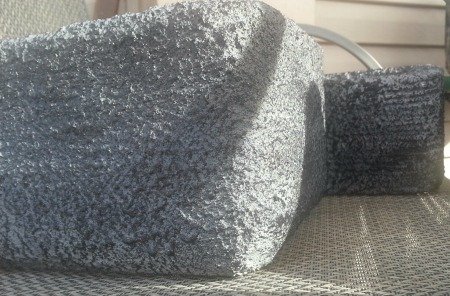
When I found an article on making Almost Hypertufa troughs from old Styrofoam, it seemed like a good idea. And I was anxious to try either as a faux or almost hypertufa, or just to mix up some mortar and coat the outside of the Styrofoam box, perhaps to make a more insulated planter.
Finding the Styrofoam boxes was not a problem.
Some I have found in thrift stores. I suppose they are discarded fishing supplies in some instances. Some of them may be a discarded mailer or transporting container for medicines that must be shipped in an insulated container and have to stay cold with dry ice? So there is possibly a free supply at the pharmacy or medical facility?
I have found large Styrofoam shipping boxes at the local grocery. These are shipping boxes for fresh fish and seafood.
My daughter asked the meat department at our local Kroger store and got several long fish boxes, lids and all.
They are stinky, but a quick wash made it better. I have kept them outside stacked on my deck to make sure they air out. I have not seen a single cat! LOL
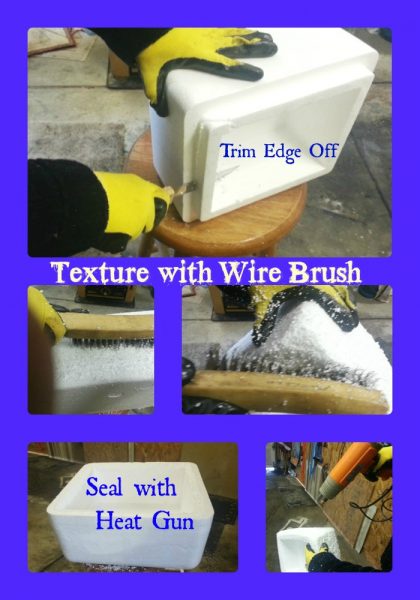

Step One: Putting a Texture on the Sides
Your first step is to take a bread knife and scrape at the outside of the box. Remove any lip or double edge on the top, and if your box has them, trim around the corners. (My taste, maybe not yours). Then, using a wire brush, like this Osborn International Steel Wire Scratch Brush scrape gently down the sides, using up/down or side to side strokes. I have done both. I’ve even done both together which turned out like a basket-weave texture, I thought.
WARNING: This is so messy because those little beady-things go all over the place when you scrape them. Wetting them down helps, but just scrape and plan on vacuuming with your husband’s Shop Vac to clean it up. (I’m not messing up mine!) In fact, do this part in the garage. I did 4 or so at a time, then cleaned up the big mess. When you finish, the Styrofoam excess can be recycled. (Update: In some areas, this cannot be included in your recycle bin. Check locally to see if you can.)
Next you will need to heat the surface of the Styrofoam with an Asnish Fast Heat Hot Air Gun. Or another heat gun if you have it. This one has variable heat settings and works really well.
Don’t heat the Styrofoam enough to burn it. It WILL CAUSE FUMES which are not good for you to breathe. Just wave the gun over the surface to cause some of the “softness” to harden gently, not til it’s brittle. Do this outside or in vented garage.
Use a drill such as GardenJoy Cordless Power Drill Set: 21V Electric Drill with Fast Charger 3/8-Inch Keyless Chuck to make a few large drain holes in the bottom. For a one square foot bottom, I would put no less than four holes. These are NOT POROUS like hypertufa!
It’s great to have your own drill and the cordless ones are fantastic.
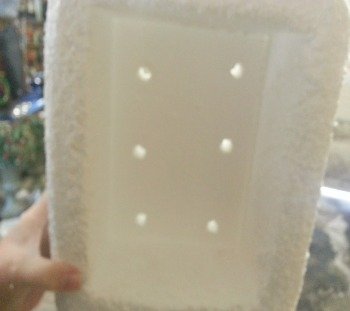
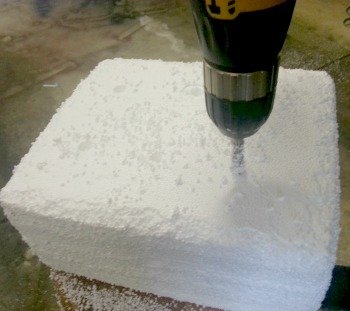
You need to be sure that you create enough drain holes. But these planters still are good for plants that may need a little more moisture than the sedums/succulents that are best suited to your hypertufa.
Would you want a cement exterior? Check out this video. It works just fine!
Step Two: Painting it Creatively
YOU MUST USE LATEX PAINT. LATEX WASHABLE PAINT
Try to get it cheaply on the “Mistakes” bin at Lowe’s or Home Depot. Paint is expensive at $35-45+ a gallon, so get the $10 per gallon mark down! Especially when you will be experimenting with buffs, browns, grays, tans, blacks, browns (they looked purple when I painted). Get a variation of white to dilute other colors.
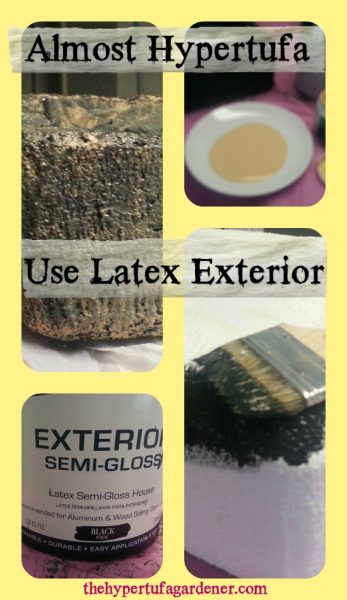
Paint entirely including a little ways onto the bottom and down inside the top a few inches so that your soil level covers the white Styrofoam. You don’t want that to show above the soil or at the bottom.
If you don’t feel you need a whole gallon or quart, get those little sample jars! Perfect for an experimental idea at $3. I found that I liked the look of completely painting the box in one color, then sponging or dabbing or streaking a little unevenly as a top or second coating ( I did it while the other was still wet) …but each is unique!
Mortaring – If You Want
When I painted some of my faux or almost hypertufa planters, I mixed some of the paint with mortar (figure your paint as a portion of the liquid per your mixing instructions). It is very thick or thin, depending on how you mix it. But I could either paint it on or use a trowel and smooth it on thinly and brush-streak it. I think some of it seems to paint on easily and really look like concrete or hypertufa. What do you think?
The ones I have made this past fall are out in this -30 degree weather and snow. I have seen no deterioration as yet. I will report what I see after the thaw.
*Feb 18, 2013 Snow has melted and I can uncover the faux hypertufa. It is like new. No deterioration of the paint or the mortared surfaces. This was my first time over-wintering the painted faux trough and the mortared Styrofoam. Success!
These resulting planters are to be used for ornamental plants etc. I don’t think they should be used for food crops. You may want to research that if you feel differently.


You mentioned in your hypertufa table top (say THAT 5 times fast) article that you tried creating a fern leaf print but it didn’t go so well. What did you learn from that and what helps to make a nice fern leaf effect? Thanks.
I think I would go a little less of the peat moss and perlite and heavier on Portland cement. It needed to be smoother so that the imprint of the fern would be more defined. Or I needed to choose a leaf which had heavier veining. Live and learn.
Great idea! Thanks. I think I’ll try this with the expandable foam, as I like rock-shaped, free-form planters. Hardware store, here I come!
Hi from Tasmania Kim. I was just wondering, what were the colours you used on your boxes.
Thanks, Jen 🙂
I used black as the first layer, then sponged a beige-like color until I liked the tones I got. Some others were black, then sponged with white. Those were the ones that turned out mostly gray. I ended up liking the black with sponged beige best.
What a great idea, thanks! I love those ‘fishy’ boxes from the grocery store. I have used them for my ‘winter sowing’ a lot, and they work perfectly, and last forever! Well almost anyway. 🙂 Painting them will make them look more like planters then Styrofoam boxes..LOL. FYI, winter sowing is one of the many gardening forums at gardenweb.com if anyone is interested. Anyone who gardens should check them out. Anyhow, absolutely am loving your site. Thank you again for a great idea!
Thanks so much and I appreciate your visit. Love that winter sowing forum and Garden Web is totally awesome!
Question for anyone – has anyone tried Portland cement? Or will this only work with mortar on Styrofoam? I have 94 lbs. of white Portland cement that I have been using for hypertufa (not mortar). Thanks much.
Hi, Sandy, I don’t think you would have any problem using Portland with a bit of fine sand in it. That is basically the same thing as mortar anyway. More sand, more texture.
This is something I am going to try. This looks to be a very creative endeavor. I have enjoyed reading all the posts and all your comments and instructions.
I’m hooked and I haven’t started yet!
Patty
Thanks, Patty. And have fun making some this year. I know you will love them.
I have made several hypertufa containers out of styrafoam and they have lasted years in the garden. A much easier way to make the box is to brush diluted carpenters glue all around the sides of the styrafoam as you work before you add your cement mix. It keeps it from slipping. The glue dry’s fast so do a side at a time. After a day of drying then score the edges and sides how you like them. You only need to cover the sides, top rim and a few inches down the inside till the soil level line.
Thanks, Sharon. I have only added cement mix to the outside of two of mine. The rest I have just painted and tried to artistically represent stone, some with a lot of color. LOL But I do want to add some cement to the outside of a few other new projects and that carpenter’s glue hint is awesome. I appreciate that.
Use Elmer’s glue and mix it with the Portland mixture.
Great idea!
Kim, did you have to seal it when you were through.I am going to try it. Wish me luck.
I don’t seal it except for the heat gun process to smooth it out. And the painting if you would consider that sealing. But that is all I do. Thanks for visiting and commenting.
Hi Kim, love your ideas!
My question is: i dont have a heat gun….do u think using a hairdryer would work just as well?.
I think it would work if it gets hot enough to change that outer surface into the “harder” texture. Just needs to seal it off. Good luck. I think you will be fine.
This is a brilliant idea. They really do look like hypertufa, and it’s good to use that styrofoam again before it goes into the landfill!
I have them outside now, and had them outside last year and they survive well. I put soapwort seed last year, so I have a lot of cascading plants now. Can’t wait til spring to see how it will look blooming. Thanks for your comments.
Hi there Kim from Australia., I got into hypertufa about 6months ago and can’t get enough of it. Without going into detail I needed to look for a hobby that would take me into my garden without doing strenuous activities due to having 4knee operations. I go around op shops to find all different moulds and love going home to make them. I don’t know about you but I get really excited at each one I unmould as they are never the same so I am not tiring of this hobby. I love your site and I have picked up a lot of tips so I just wanted to say thank you so much for all of your tutorials you are doing a wonderful job.
Yours hooked on tufa Linda
Hi Linda, so glad to hear you are enjoying hypertufa. It is something you get into and want to make more and more. I love finding a new shape to try out. It makes me happy, I can putter in the garden a lot, and I don’t have to pay ungodly prices for a pretty planter. Thanks for your comments.
All the girls at work love your fake hypertufa pots!!! You are so creative!
Tell those girls they all need to get on here and comment!
Very informative, interesting, nice photos. We’ll done!
Thanks so much, Carol, for taking a look and for taking the time to comment.. I appreciate that.