
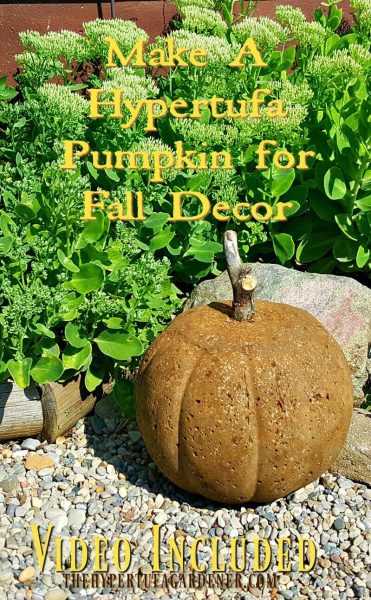
Make An Awesome Hypertufa Pumpkin For Fall !
How to make hypertufa pumpkins?
Well, let me tell you! I have made several hypertufa pumpkins this week ( My post was originally written in August 2016 and those pumpkins are still in fine condition and the branches/stems are still there on most of them!) and I am truly surprised at how well they turned out. And I can’t wait to show you.
My husband helped and we made a video of our procedure. I have included it in this post plus a printable to show you the amounts of material you will need based on how many pumpkins you’ll be making.
I like to make different things as you well know. For instance, have you seen my hanging basket liners made with hypertufa? Or the rain barrel I attempted ?
Oh wait, maybe you shouldn’t go look at that Epic Fail. But I defended myself here.
How to Make Hypertufa Pumpkins – The molds
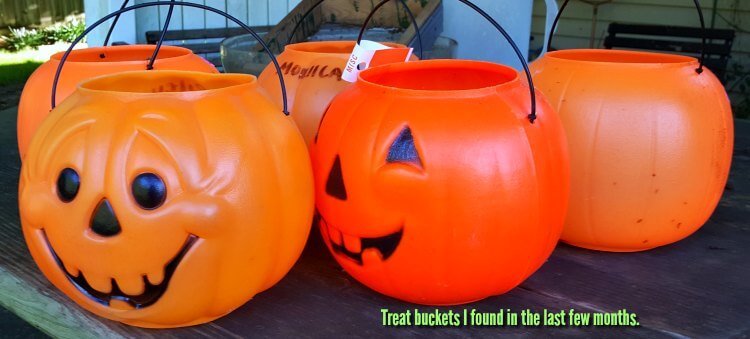
I have been collecting the small Pumpkin Treat buckets during the past year. At least, when I remembered. When I was out at garage sales, I tried to remember to pick them up when I saw them for 25¢ or less. As you can see, some of these have children’s names on them from Trick or Treat Night.
I know there were a few I passed up because of “brain fog” or something. But when I remembered, I got a few. By a few, I mean I have five of them.
Some of the orange buckets have deep indentations in them so that they look more like pumpkins they represent. I like them most of all. Other buckets have a more shallow indentation, but these still make an attractive mold.
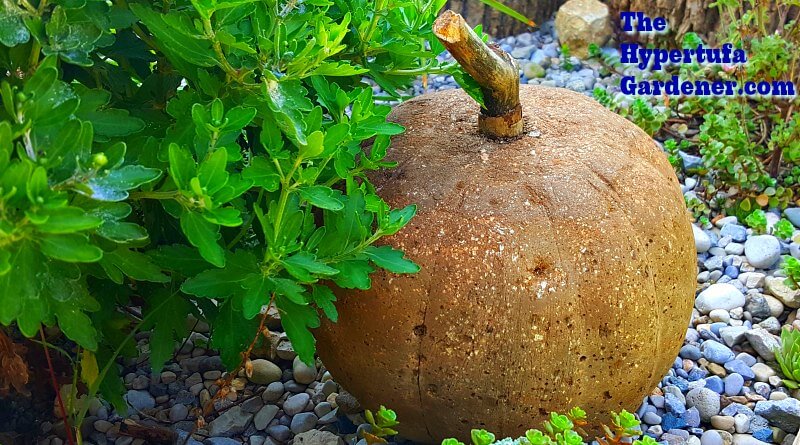
I altered my basic recipe that I have used on my hypertufa troughs. I don’t know why I felt I needed a “stronger” recipe, but I have used a ratio of 1:1:1 which means equal parts of Portland cement, peat moss and vermiculite. Since I only made these a week ago, I don’t have any idea of any long-term difference. But they turned out really well as you can see in the photos and the video.
I cured 24 hours inside the mold in my empty peat moss bag, then removed them from the molds by cutting the buckets off. I textured them and re-bagged and cured 24 hours more. Now they are just sitting outside in rain and heat.
For color, I used Quikrete Liquid Cement Color. This is an affiliate link through Amazon. If you have not used or bought this before, click on over to check it out so you will know what you are looking for by its photo. If you are near a local Lowes or Home Depot, look for it on shelves in the Cement aisle. The bottle I bought this week was just $10.75. And of course, I took my husband so that I can get the 10% discount at Lowes.
Did I say I was frugal?
The ten ounce bottle is supposed to color two full bags of Portland Cement. Excuse me? I got just a small amount of color using almost half of the whole bottle. I used two gallons of water and four ounces of the color. Just so you know.
The pumpkins look more colorful in different lighting conditions, but if you are looking for a lot of color, just get a small jar of orange latex paint and paint it when it is dry.
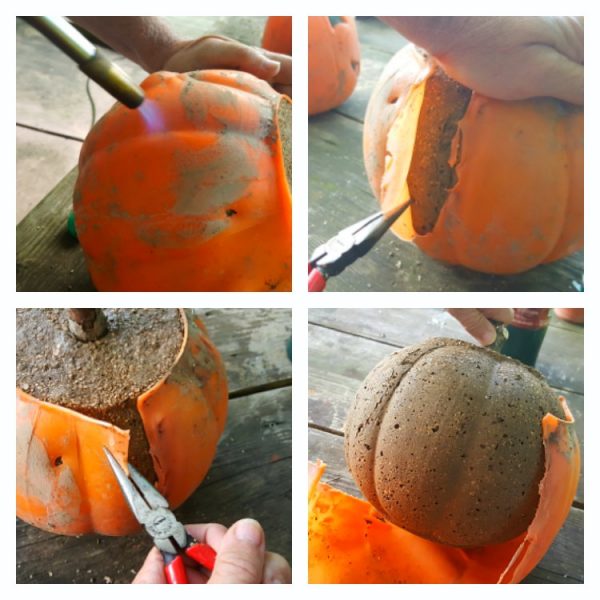
My husband used the Propane Torch to slightly warm ( and somewhat melt) the bucket since it was too heavy a plastic to cut off easily. It gets VERY HOT QUICKLY, so just a quick couple of passes over the edge you want to cut and you are good. Wait a moment before you touch or use long needle nose pliers, the ones you weed with, right?
Here is the video showing the steps I took to make hypertufa pumpkins. I did fast-foward in spots since it took a while to do this. I had fun doing it and did a Voice-Over since you wouldn’t want to hear my husband and I bickering as we do this, right? We are both control freaks.

How to make hypertufa pumpkins – What about the amounts to use?

I have made a printable document with the amount of material you would need based on the amount of pumpkins buckets you would use. Please take a copy and save it or print it for reference. If you make bowls of a similar size, you might want to put a note on the line that describes the amount that worked for you. I hope it helps you. Let me know if more printables would help you and I will see if I can’t provide it for you.
Click here to download full page printable: How much of each material do I need?

After all, you readers and subscribers are the ones I do this for! Thanks for visiting! Now go make some pumpkins!
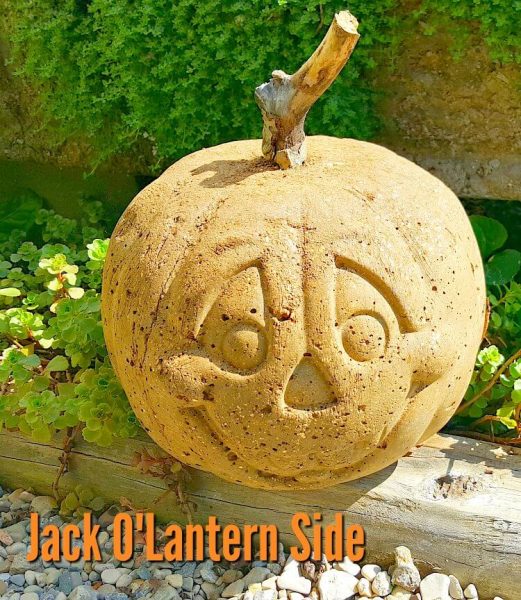
Any ideas for removing face ? Do you think this could be wire brushed off or covered up before the mixture goes in? Thank you
Yes, when the pumpkin first comes out and you are brushing it to get your defects removed, just brush also on the face imprints and they can be removed also.
You have inspired me to get going and make some! Thanks for the video! Happy Fall!!!♥
So glad and thank you. Be sure to post some photos too!
Just found your site and I am so excited. I have never worked with anything like this and can’t wait to get what I need to start. On the pumpkin in the first picture, the top looks rounded on the edges like a real pumpkin. Further down where you are cutting off the plastic it shows the cement “line” at the top where it was filled. Is the cement still soft enough to smooth the line out? How did you do that? Thank you for sharing all your talents with us.
Yes, it did have a line and I rounded it off with a rasp or steel wire brush. I thought I showed that on the video. I will need to go check it out. Anything like that just shape it up how you want it. These are so fun to make.
Such an awesome idea! I love decorating and it means more to me when I can make them myself with my kids. Thanks for sharing. I look forward to making the pots just like yours as well!
Thanks for taking the time to tell me. Hope the kids like them. Have them wear gloves to handle the mix. ( And do the dry mixing with a mask too.)
Hi Kim, I have 2 pumpkins made so far and they look exactly the same as yours, thank you so much for the instructions and videos. I’m addicted, I have been making pots for a month now and although it’s hard and dirty work, I love it…
I am so glad you love them. They are cute to make, but messy, but my little grandson thinks they’re great. I hope someday he can give it to his child.
Are they heavy for kids to handle after?
Those are marvelous and so inspiring. I really appreciated the video you put together too. Now to find some time to make a few of these. My 4 yr old can’t wait. He wants to do the “stick part”. 🙂
That will be cute. Photos of him making one and marking it with his/her initials. Priceless!
You really are the Queen of Hypertufa, coming up with new ideas all the time-and this one is a great one. Thanks for leading the way.
Thanks, I have seen a few but not made from hypertufa, so I had to have a go at it.
I have made 13 so far and am enjoying every one of them. Will be decorating them up and giving as gifts.
10/23
What a cool fall project!
Thanks and I hope you try one!